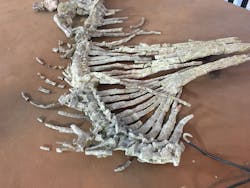
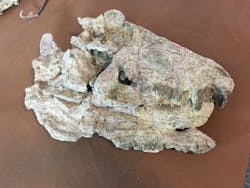
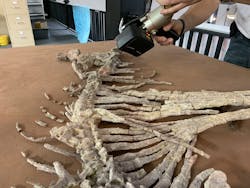
Growing up to12 feet in length with powerful jaws and specialized teeth for stabbing and tearing apart its prey, the Dimetrodon limbatus was one of the fiercest creatures to roam Texas. A fossilized skeleton of the Paleozoic predator were recently scanned by NVision, a provider of non-contact optical scanning/measurement, for the Texas Through Time museum in Hillsboro, Texas.
Paleontologist Andre LuJan founded the museum to preserve and promote the Lonestar state’s rich fossil history. Free to the public, the museum features a wide assortment of fossils from all ages and formations, including many one-of-a-kind fossils not available anywhere else. Although primarily focused on the noteworthy fossil diversity of Texas, the museum’s collection also includes fossils from around the world.
The vast age and paleontological value of the skeleton -- discovered in a rare death pose -- made copying it for further study and display a priority. LuJan, who had used 3D scanning and printing before, chose to use the same process for the Dimetrodon skeleton as well as several other Permian skulls/skeletons from Texas. “I felt it was absolutely necessary to have these fossils 3D scanned as it is less damaging than traditional molding and casting,” says LuJan. Scanning also avoids the use of casting materials that may permanently stain fossils.
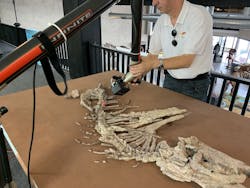
The detailed scan data will enable the paleontology museum to 3D-print exact replicas of the fossil for further study and education. All scanning was done onsite at the museum in order to minimize the potential for damage to the rare fossils. Using NVision’s handheld laser scanner, technicians collected data on all the Dimetrodon’s skeletal structures as well as the skull fossils. The scanner is attached to a mechanical arm that moves about the object, allowing the user to capture data rapidly with a high degree of resolution and accuracy. These points comprise an exact duplicate of the object’s surface, down to the most minute detail.
“There are lots of challenges when working with fossils, the first and foremost being that they are fragile and irreplaceable,” says LuJan. “The handheld scanner was a perfect fit for our static mounted skeleton. In the past we have used fixed base scanners where each individual piece of the skeleton must be separately placed on a scanning turntable and damage occurred in the process. This time zero damage occurred during the job.”
3D digital scanning is revolutionizing the preservation and study of paleontology specimens, making it possible to replicate priceless fossils, exact in every detail to the originals. Scanning of the Dimetrodon and other Permian fossils was completed in two days. “The data that NVision helped us collect from our specimens will be crucial in understanding Texas ancient history and past life,” says LuJan. “We anticipate many more benefits through using the data for scientific study as well as making affordable replicas available for display and education.”
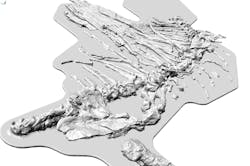
NVision President Steve Kersen tells IndustryWeek the data as collected during the scanning process is in the form of a discrete point cloud, each point with its own X,Y,Z position and I,J,K vector values. In the case of the Dimetrodon limbatus scan this was approximately 33.5 million points.
“The next stage in the process consists of converting this data into a triangulated format. The custom software for the Handheld scanner, analyzes the points, reduces the overlap between the scanned patches and produces a file with one-point thickness at a triangulated resolution specified by the operator,” he says. “Certain parts of the triangulated file model will likely need to be repaired. After that, the completed file can then be saved in stereo lithography (STL) format, which can be fed into the software for 3D printing machines.”
Of course, such raw triangulated file is unlikely to be a “closed watertight model that is required for the 3D printing process, so areas that have holes or other defects need to be repaired.” With the Dimetrodon specifically, these areas were primarily the area on the underside of the neural spines, which formed the sail, and the lower portions of the spine. These areas could not be captured with the scanner due to line-of-sight issues.
“However, the software enables you to fill in missing areas, using curvature-based algorithms, to create a watertight model and project open boundaries of the spine to the surface below,” says Kersen. “Another concern was that the sail was elevated from the surface of the display board as it extended from the spine. To support this length, columns were created to supply additional support as required.”
3D non-contact optical measurement provides an opportunity for quality excellence that was unavailable to earlier generations, explains Kersen. “By providing manufacturers with the exact 3D dimensions of a physical object more quickly and accurately than traditional measurement tools, it enables the rapid reproduction and/or redesign of a product, whether it be a small part or an automobile chassis,” he says.
Non-contact optical scanning is especially valuable for reverse engineering and reproducing parts that may be lacking their original computer-aided design (CAD) files. “Capturing the surface geometry of products with complex surface twists and turns, which once would have been difficult at best, is not a problem with optical scanning,” he says.
About the Author
Peter Fretty
Technology Editor
As a highly experienced journalist, Peter Fretty regularly covers advances in manufacturing, information technology, and software. He has written thousands of feature articles, cover stories, and white papers for an assortment of trade journals, business publications, and consumer magazines.
