New Product Plans - Building Robust & Realistic Timelines
The previous article in this series summarized the necessary elements of governance required to build a disciplined system for bringing qualified opportunities into the organization. Once you’ve decided that a new product opportunity is consistent with strategy, meets financial hurdles, and is feasible, the next step is to create a robust plan and realistic timeline that your team and customers can understand and accept.
The answer to creating robust plans lies in a different approach called Critical Chain Project Management—a fundamentally different approach to projects that has allowed thousands of companies to reach as high as 95% on-time performance. CCPM takes the padding out of individual tasks and uses part of it to create a shared project buffer. The result is 25% shorter project durations, but with plans that avoids procrastination and actually protect due dates. Plans are built for rapid execution where, like a relay race, key tasks start as early as possible, people work with limited interruptions and multitasking, and the “next runner” is always ready for the handoff.
At this point, you might question going through the effort of planning without knowing whether or not you have the necessary resources available—it’s a chicken or egg problem. One way around it is to create a set of what we call wireframe templates based on previously completed projects. Then using the wireframe closest in size and shape as a proxy, you can evaluate how adding that level of resource usage would impact the execution pipeline. More on that in the next article.
As you start building the project plan, one of the first pitfalls you’ll want to avoid is a lack of cross-functional involvement. People are busy, so it can be hard to gain their participation in planning. But it’s essential if you want realistic plans that people will commit to. Planning done by a project manager in a vacuum just won’t get you there.
With your cross-functional team, conduct right to left planning using the time-honored analog method. Yes, analog. There are plenty of software tools available, but at this stage, nothing works better than good old Post-it notes on an oversized whiteboard or even a wall—one Post-it per task.
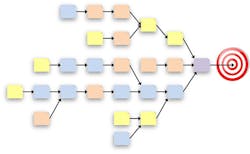
Start planning from right to left (completion to beginning) by asking what has to happen before we can start the final task. There may be multiple tasks that have to be done before any given task can start, so make sure to ask what else has to happen too. Then do the same thing for each of those tasks. Repeat this process over and over for each chain of tasks until you get to all of the initial or gating tasks which have no predecessors.
The resulting diagram will be your initial project network and should look something like this:
Every task should have a clear definition for done, but it takes some practice to do this type of work breakdown correctly. A common mistake is to size tasks either too large or too small. Too large and you won’t be able to visualize flow effectively—something we’ll cover in a later installment. Too small and you’ll burden the organization with too much detail and too many hand-offs.
Evaluate your project network by reading it out loud from left to right to uncover any missing tasks. At this point, it is also helpful to bulletproof your plan by brainstorming a list of potential obstacles and making sure that the network has the tasks necessary to overcome the most significant ones.
Taking Out the Padding
With your network in place, identify what resource types (engineer, chemist, programmer, designer, etc.) will be necessary and how long each task will take. No one wants to admit it, but most tasks are estimated at 2-3 times the actual “touch-time” in order to account for waiting, interruptions and inevitable problems. While well meaning, this padding obscures the project status and encourages unproductive behavior.
You’ve seen it before—give students more time than they need to write a research paper, and they wait until the last possible minute to start. But “Student Syndrome” isn’t limited to students. So with the actual status hidden and the task-level protection wasted on procrastination, unexpected problems inevitably derail your on-time finish.
Instead, it’s critical here to specify only the touch time or effort—not the elapsed time. For example, it may only take one day of effort for a drawing, but because of interruptions that work is spread over 2 days of elapsed time. In this case, the touch time would be estimated as 1 day.
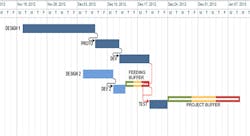
Using available critical chain software (Exepron for the web is my favorite and a Gartner 2016 Cool Vendor), determine the project’s critical chain—the longest series of tasks without planned multitasking. In the timeline below, the critical chain is represented by the darker blue bars. The lighter blue bars represent feeding chain tasks.
The only way to shorten the project duration is to scrub the critical chain looking for tasks that could instead be done in parallel without multi-tasking. For instance, in the example above, if the PROTO task could be done in parallel with the DESIGN 1 task, the project could be delivered 7.5 days earlier (5 days of task time and 2.5 days of buffer). Be careful though—this can add significant financial or technical risk which management may need to approve.
Because we used touch times for the tasks, there will always be unexpected delays and interruptions. So we also add a time buffer equal to 50% of the CC duration at the end of the project. That’s the green-yellow-red bar at the end of the critical chain. The buffer is there to act as a shock absorber protecting the project due date.
There’s another potential pitfall here. Inevitably some managers will campaign to eliminate the buffer. You can’t allow that though because it would guarantee a late finish no matter how good your execution is. Additionally, later on we’ll see how the buffer becomes a very effective tool for measuring the risk of missing the due date—a tool that is at the core of effective execution.
The final steps are to review and document the plan. Here it’s always a good idea to have a subject matter expert who was not involved in the planning do the review for objectivity. Then you can also decide if the project plan should be saved as a template for future projects.
Managing New Product Pipeline Entry to Avoid Derailing Projects Already Underway
This article summarized how to build a robust project plan with a realistically achievable timeline. In the next article in this series, I’ll explain how to schedule work into the execution pipeline at a rate that maximizes throughput by not delaying work already in the pipeline.
Tired of throwing money, people & resources at new product delays - and still not getting the results you need? Download Mike Dalton’s "Dealing with New Product Delays When Throwing Money at It Isn't the Answer" outlining seven areas for uncovering hidden innovation productivity in your organization.
About the Author
Mike Dalton
Managing Director
Mike Dalton is the founder of Guided Innovation Group, where for nearly 20 years he has helped leaders in highly engineered product companies make new products a reliable competitive advantage. He has contributed numerous Industry Week articles and is the author of Unlocking Innovation Productivity and Simplifying Innovation.


